


.svg)


On this page:
Developing quality Android applications is hard and complex. The code we write has to be testable, robust and flexible enough to adapt to growth and changes. Android framework does not enforce us to write code in any specific architecture, which can be a good or a bad thing depends on our decisions.
How to develop a good Android application?
Couple years ago almost nobody cared about how to develop a good Android application. Nowadays, on the other hand, we have a lot of examples how to use MVP, Clean Architecture, VIPER but why should we care? Well, there are many important things we should be aware of.
- Every application goes through a lot of change cycles and features addition and removal.
- Every time you change something you should be able to test new functionality and also make sure your changes didn’t break any of the existing app features.
- We should also keep in mind that we have to deal with many Android versions, screen sizes, orientations and finally device manufacturers.
Choosing the right application architecture can make dealing with all these challenges much easier but before we’ll dive into it, we should take care of some basics which will make our life much easier.
Basics of Android app architecture
Package structure
Instead of using layer structure like fragments, activities, adapters etc. you should package by feature. Grouping classes by feature provide higher level of abstraction, more readable and maintainable structure, easier code navigation and it’s much easier to scale.
For example, if you have DetailsActivity, DetailsFragment, DetailsListAdapter, DetailsItemModel you should put them in one package.
If you have a custom Application class make sure to put in in the top-level package.
File naming
Class files
Any class name should be created using UpperCamelCase, for example, ListActivity, DateHelper etc.
When a class extends an Android framework component it should always end with the component name, for example, ListActivty, ListFragment, ListAdapter etc.
Layour files
In the case of XML files names, you should always use lowercase letters and underscores, for example, activitybook, fragmentbook, item_book. It makes it clear as to what the layout is used for. Every layout file should be named starting with the name of Android component that it has been created for:
- Activity – activity_
- Fragment – fragment_
- Dialog – dialog_
- Widget – view_
- AdapterView item – item_
Drawable files
Drawable resources should be named using the corresponding prefix to make it clear to what exactly the item is used for. It will also help to group similar items.
Most common drawable types should use the following prefixes:
- Icons – ic_
- Selectors – selector_
- Background – bg_
- Divider – divider_
- Progress – progress_
- Circle – circle_
To create selector state resources you should use the following suffixes:
- Normal – _normal
- Pressed – _pressed
- Focused – _focused
- Disabled – _disabled
- Selected – _selected
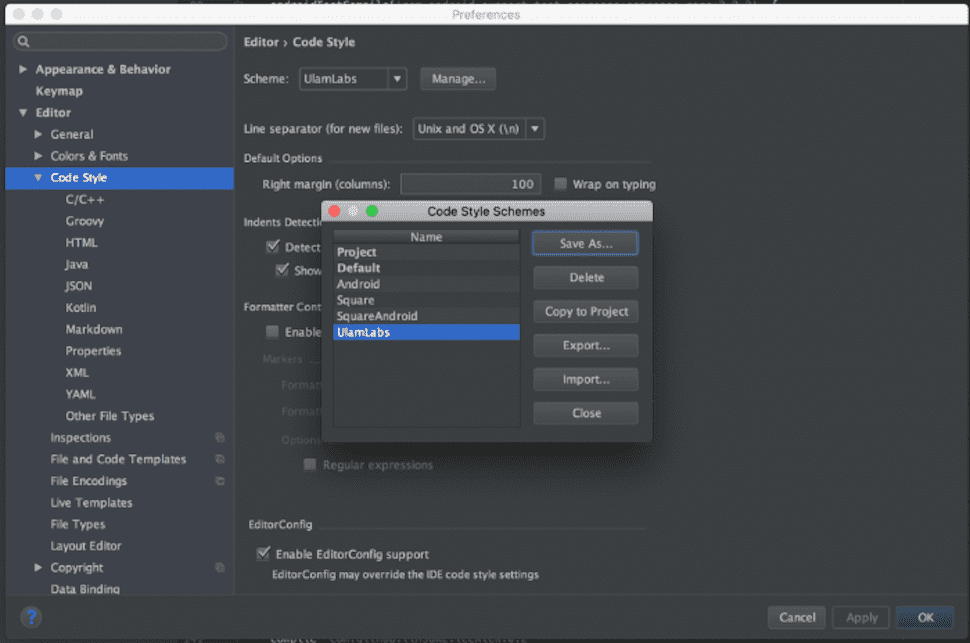
Code style
The most important thing to remember about code style is the fact it should be shared across the developers who work together. Code style config file can be easily exported from Android Studio and used by other developers.
Strictmode
Android has a tool to catch many common platform-specific problems that bridge the gap between compilation errors and runtime crashes. StrictMode analyzes your application at the thread or virtual machine level and alerts you with potential problems.
To use strict mode all you have to do is some configuration in your custom application class. See the following example:
The above code enables all the checks, make sure to check StrictMode | Android Developers to understand what all the possible checks means and choose the most important ones for your application.
Building Android application
Android uses Gradle build system. It allows to manage dependencies, setting up different flavors of your application and many other useful things.
Gradle and Android plugin are independent of Android Studio so you can also build your application from the command line (it’s useful when you want to use continuous integration or a remote machine to build your apps).
- To avoid dependency version mismatch define versions as project level properties. See the following example.
Top-level build.gradle file:
Module-level build.gradle file:
- Group related dependencies
What are the components of Android application architecture?
To make our code clean and testable we need something which will decouple the application code into components based on its role ( Separation of concerns – Wikipedia). Let’s have a quick look what is the foundation of the MVP design pattern. See the following diagram.
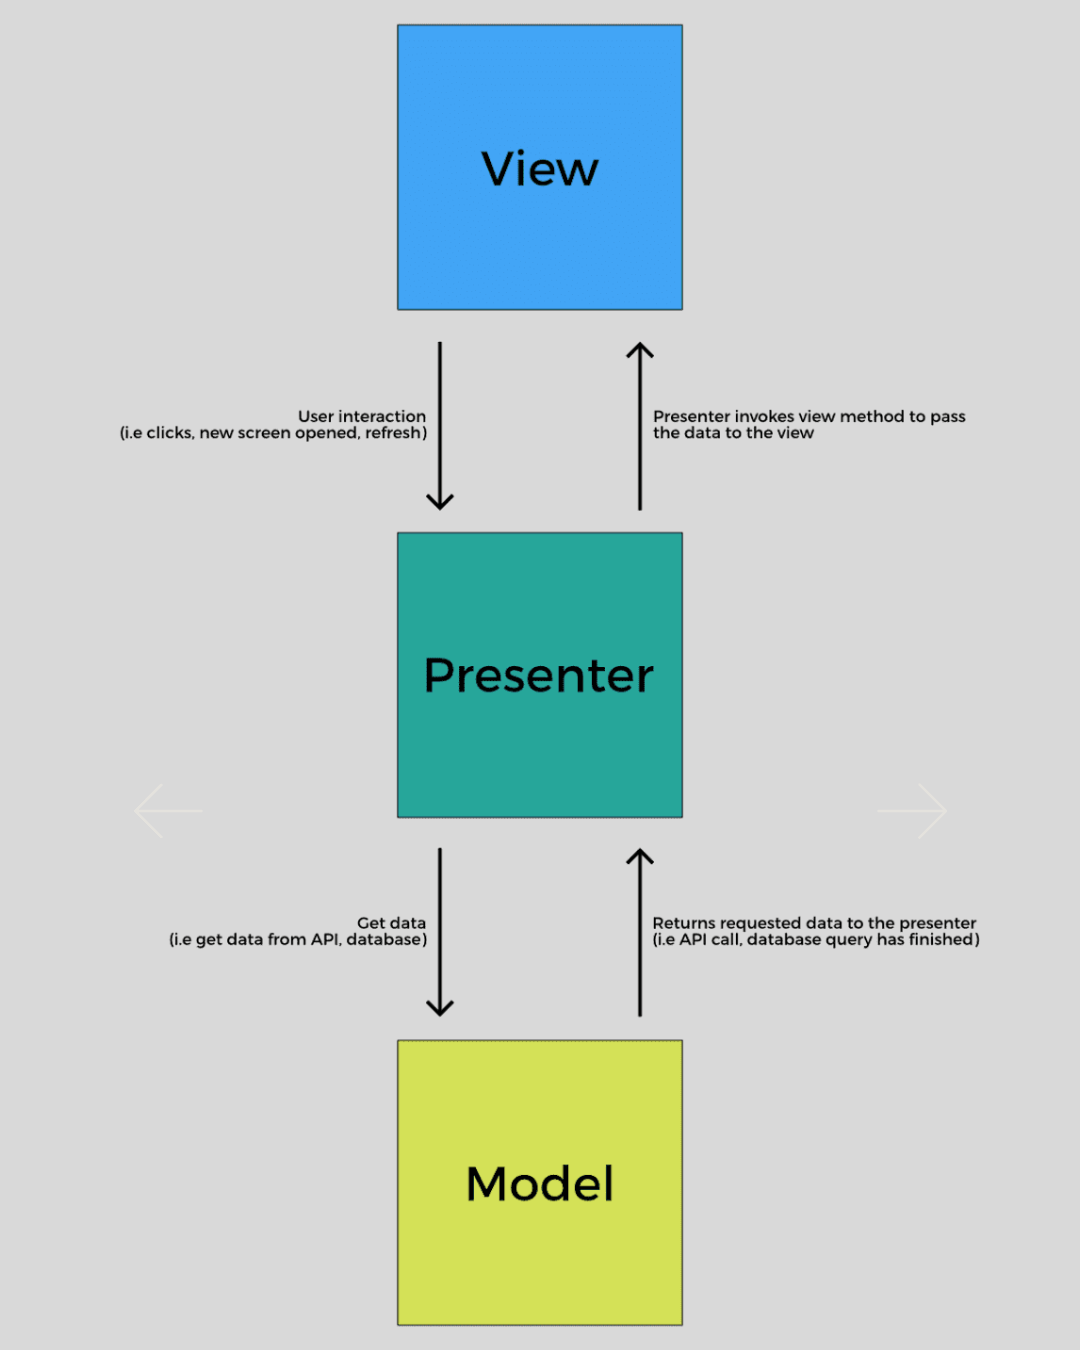
As you can see, MVP divides the application into three types of components:
- Model – responsible for all data related operations (POJO’s, fetching the data from API, querying the database etc.)
- View – UI layer responsible for displaying the data (inflating the views, showing/hiding them on specific conditions etc.); this is the dumbest part of the application, it cannot contain any business logic; it communicates only with a presenter, never with a model directly
- Presenter – Every user action performed on the View is delegated into presenter; it performs a needed actions on a Model and returns the results to a View; acts like a middleman between View and a Model
Short summary how you should use the MVP on Android:
- In most cases an Activity, a fragment or a custom ViewGroup will act as the View
- Presenter and a View has one-to-one relationship
- Presenter communicates with a View through an interface
- Presenter can’t have an access to any of the Android API’s directly (it has to be platform independent and unit testable)
- Presenter shouldn’t know about all the complicated Android components lifecycle
Now we already know what MVP is and it’s time to use it in our Android application. Let us assume we have to implement a screen which will display a list of some repository contributions.
View
In a real world example our view should be able to:
- Show the list of contributors fetched from Github API
- Show the progress during the API call
- Show the empty view in case a selected repository doesn’t have any contributors
- Show an error in case of API errors, I/O errors and every other unpredicted situation
Based on this list we can create the view interface:
Basically, it doesn’t matter what will be implementing this interface and it totally depends on how you want to create this screen. It could be an Activity, a Fragment or a custom ViewGroup. We are going to use an Activity:
Model
Our model layer will contain couple classes.
A simple POJO to map an API response:
Github API interface (using Retrofit, if you don’t know what is it make sure to check Retrofit):
Presenter
The presenter is responsible for calling a GithubApi, and passing the results to the view.
To see how the above classes work together check out the https://github.com/ulamlabs/android-starter/tree/master/app/src/main/java/com/starter/ui/contributors
This is what is going on step by step:
- View calls a presenter to fetch the contributors when a screen is being started
- Presenter calls a view to show a progress bar during an API call
- In case of any error the presenter calls a view to show an error with a description what has happened
- If the API call finishes successfully a presenter checks if the list isn’t empty and calls a view to show the fetched data.
- If the list of contributors is empty a presenter calls a view to show an empty screen.
Testing Android application
We’ve implemented our screen and it’s time to check if it works properly. To ensure everything works like its supposed to we are going to create two tests:
- Unit test for a presenter to test if the interactions between model, presenter and a view are correct
- Functional test to check if the views are displayed correctly and the interaction between our application and external API is correct
Unit tests
To test our presenter we need to mock its dependencies. To check the interactions we have to provide mocked version of AppRepository class. To mock dependencies, we are going to use Mockito.
What unit test should actually test? In our example, we want to check if a presenter calls the right methods on a view.
- Prepare an object under test, a presenter
- Prepare a mocks to return expected values when being called
- Call the method you want to test
- Check if all the expectations are fulfilled
- It’s also important to check if nothing unexpected didn’t happen
That way you can test every case which should be handled by your presenter.
There is also one important thing to handle. To avoid flaky we should make our asynchronous operations synchronous. To accomplish it we created a class called ThreadConfiguration and we provide it as one of the dependencies.
Asynchronous operations in our case are performed in RemoteRepository class and this is where we use ThreadConfiguration class in conjunction with RxJava compose operator.
In the application, we use a separate thread for network operations and we observe the results on Android UI Thread.
In the unit tests, on the other hand, we make everything synchronous by supplying the same thread for performing network operations and observing the results.
UI tests / Functional tests
To ensure users won’t get a poor experience when using our application we are going to write couple UI tests. On Android, the easiest way to do it is to use Espresso . Espresso is an official framework which provides a lot of useful API’s to simulate user interactions. To make sure our tests are stable we have to cover two topics.
- Our application fetches data from external API. To make our tests independent from any of the external components we have to provide an API mock. There are couple ways to accomplish it:
- Provide a mock HTTP client
- Provide a local HTTP server which will be started with our tests
In most cases we use RESTMock library which is built on top of OkHttp mock server and provides a way to verify the HTTP requests which our application sends ( GitHub – andrzejchm/RESTMock: HTTP Server for Android Instrumentation tests)
- Our tests have to wait until async operations are finished before verifying the expectations. To deal with it Espresso provides a mechanism called Idling Resources. In our application, we use RxJava to handle all the async operations so we have to register an idling resource to let the framework know when the async operations are ongoing and when they are finished. To accomplish it we created a class which keeps track of active subscription count. You can find it here [android-starter/RxIdlingResource.java at master · BartoszJarocki/android-starter · GitHub](https://github.com/BartoszJarocki/android-starter/blob/master/app/src/androidTest/java/com/starter/util/RxIdlingResource.java. The last thing to do is to register an idling resource using RxJava hooks:
With basics covered we can start configuring our tests. UI tests are run by AndroidJUnitRunner. To start a mock HTTP server and register a custom idling resources we have to create a custom runner.
All we have to do now is to register our custom test runner as default one. To do this we have to specify set is in build.gradle:
With all the basics covered we can start writing tests! You can check some simple tests which cover couple cases in our sample repository https://github.com/ulamlabs/android-starter/blob/master/app/src/androidTest/java/com/starter/ui/contributors/ContributorsActivityTest.java
Summary for Android application architecture
This blog post doesn’t cover all the details about each section and it was intended to show briefly how you can write Android applications which will be easy to scale and test. Stay tuned to more detailed posts about each section and make sure to check our sample repository in the meantime!
.png)


.png)


