Kubernetes Deployment From Scratch – Networking (Part 2)
In our last blog post on kubernetes from scratch, we created a pseudo cluster to show how Kubernetes works inside. Today we are going to add a second node and make sure the cluster utilizes it.
Creating second node
What about having more than one node? What if we would like to schedule pods on 2 nodes? It is as simple as running kubelet on another node and making sure it connects to our API Server.
First of all, we assume that we have the first node from our previous blog post, with 10.135.53.41 internal IP, 46.101.177.76 external IP, running API Server, etcd and nginx deployment.
Now let’s create a second one, as before, replace --ssh-keys with your SSH key. After that, copy kubelet config file from the master node.
$ doctl compute droplet create k8s-worker --region fra1 --size 2gb --image ubuntu-18-04-x64 --enable-private-networking --ssh-keys 79:29:54:77:13:2f:9c:b8:06:3e:8b:fe:8d:c0:d7:ba
ID Name Public IPv4 Private IPv4 Public IPv6 Memory VCPUs Disk Region Image Status Tags
63460608 k8s-worker 46.101.98.124 2048 2 40 fra1 Ubuntu 18.04.3 x64 new
$ scp -3 root@46.101.177.76:/var/lib/kubelet/config.yaml root@46.101.98.124:~/
$ ssh root@46.101.98.124
In the next step, you have to install essential prerequisites - Docker and Kubernetes node binaries. Install Docker following instructions from the previous part, and then install Kubernetes with:
root@k8s-worker:~$ wget -q --show-progress https://dl.k8s.io/v1.17.3/kubernetes-node-linux-amd64.tar.gz
root@k8s-worker:~$ tar xzf kubernetes-node-linux-amd64.tar.gz
root@k8s-worker:~$ mv kubernetes/node/bin/* /usr/local/bin/
root@k8s-worker:~$ rm -rf kubernetes*
In order to connect the kubelet with the API server, you have to set the kubeconfig.
root@k8s-worker:~$ mkdir -p /etc/kubernetes /var/lib/kubelet
root@k8s-worker:~$ mv config.yaml /var/lib/kubelet
root@k8s-worker:~$ export MASTER_IP=10.135.53.41
root@k8s-worker:~$ kubectl config set-cluster kubernetes \
--server=http://${MASTER_IP}:8080 \
--kubeconfig=kubelet.conf
root@k8s-worker:~$ kubectl config set-context default \
--cluster=kubernetes \
--user=system:node:k8s-worker \
--kubeconfig=kubelet.conf
root@k8s-worker:~$ kubectl config use-context default --kubeconfig=kubelet.conf
root@k8s-worker:~$ mv kubelet.conf /etc/kubernetes
Finally, you can run kubelet:
root@k8s-worker:~$ kubelet \
--config=/var/lib/kubelet/config.yaml \
--kubeconfig=/etc/kubernetes/kubelet.conf \
&> /tmp/kubelet.log &
Now on k8s-master, we can check if the node has been recognized:
root@k8s-master:~$ kubectl get nodes
NAME STATUS ROLES AGE VERSION
k8s-master Ready <none> 81m v1.17.3
k8s-worker Ready <none> 61m v1.17.3
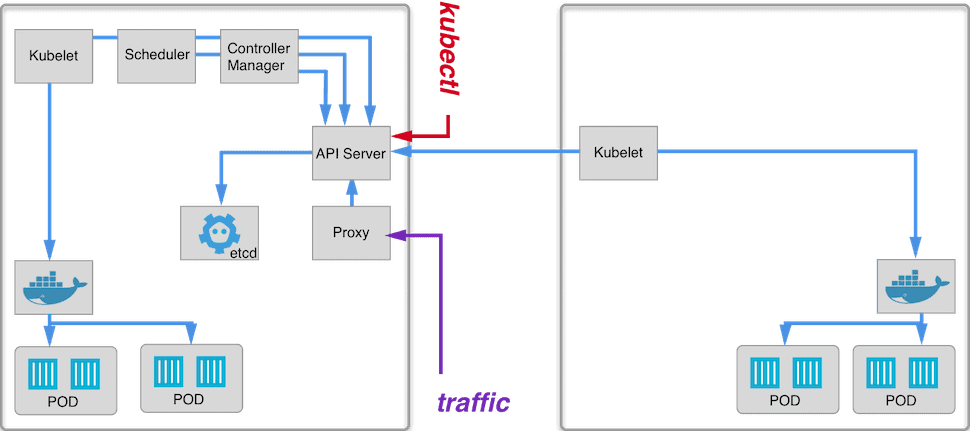
This is how our nodes look like now:
Next, let’s scale up our nginx deployment:
root@k8s-master:~$ kubectl scale deploy nginx --replicas=6
root@k8s-master:~$ kubectl get pods -o=wide
NAME READY STATUS RESTARTS AGE IP NODE
nginx 1/1 Running 0 1h 172.17.0.3 k8s-master
nginx-31893996-3dnx7 1/1 Running 0 1h 172.17.0.5 k8s-master
nginx-31893996-5d1ts 1/1 Running 0 1h 172.17.0.6 k8s-master
nginx-31893996-5xnhc 1/1 Running 0 17s 172.17.0.2 k8s-worker
nginx-31893996-9k93w 1/1 Running 0 1h 172.17.0.4 k8s-master
nginx-31893996-lfrzl 1/1 Running 0 17s 172.17.0.4 k8s-worker
nginx-31893996-q99cp 1/1 Running 0 17s 172.17.0.3 k8s-worker
nginx2 1/1 Running 0 1h 172.17.0.2 k8s-master
We can see that they are scheduled on both nodes.
Wait, can you see that pods have duplicated IP addresses? This is because we don’t have a way to manage IP address for pods among all nodes, this also means that there is no communication between pods located on different nodes.
To fix that we have to introduce another cluster component – network fabric.
Kubernetes networking using Flannel
Kubernetes makes specific assumptions about networking in the cluster:
- pods can communicate with each other by using unique pod’s IP address
- nodes can communicate with pods using unique pod’s IP address
- the IP that a container sees itself as is the same IP that others see it as
Kubernetes assumes that each pod and service in a cluster has a unique IP address and can communicate with other pods using their IP addresses. To achieve that we need a way to assign subnet of IP address for each node and ask Docker to use it when spawning containers, then we have to establish a non-NAT communication between these IP address. There is a lot of ways to do that, here we are going to focus on Flannel.
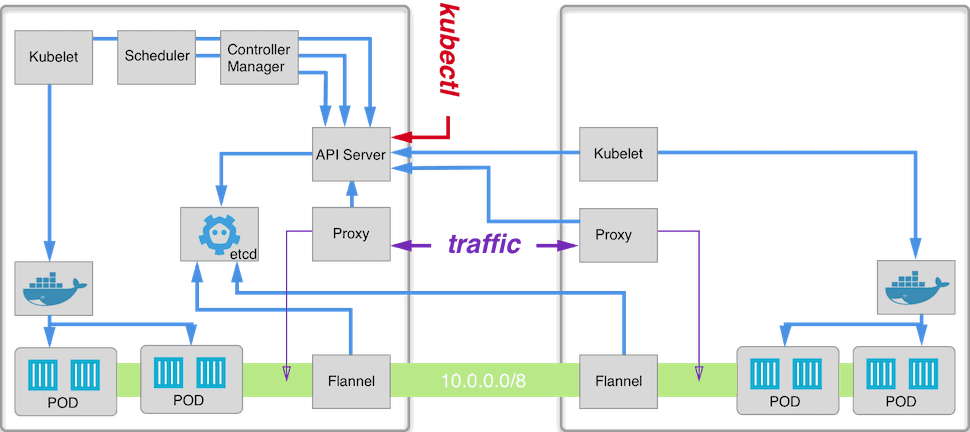
Flannel is one of the easiest ways to achieve these assumptions. Basically, Flannel runs as an agent on each node and is responsible for allocating a subnet for that node out of configured address space. That subnet is used by docker to obtain IP addresses for pods. Each subnet together with node’s IP address is stored in etcd and is readable by all agents. This allows flannel to obtain node location for given pod’s IP and forward traffic to that node.
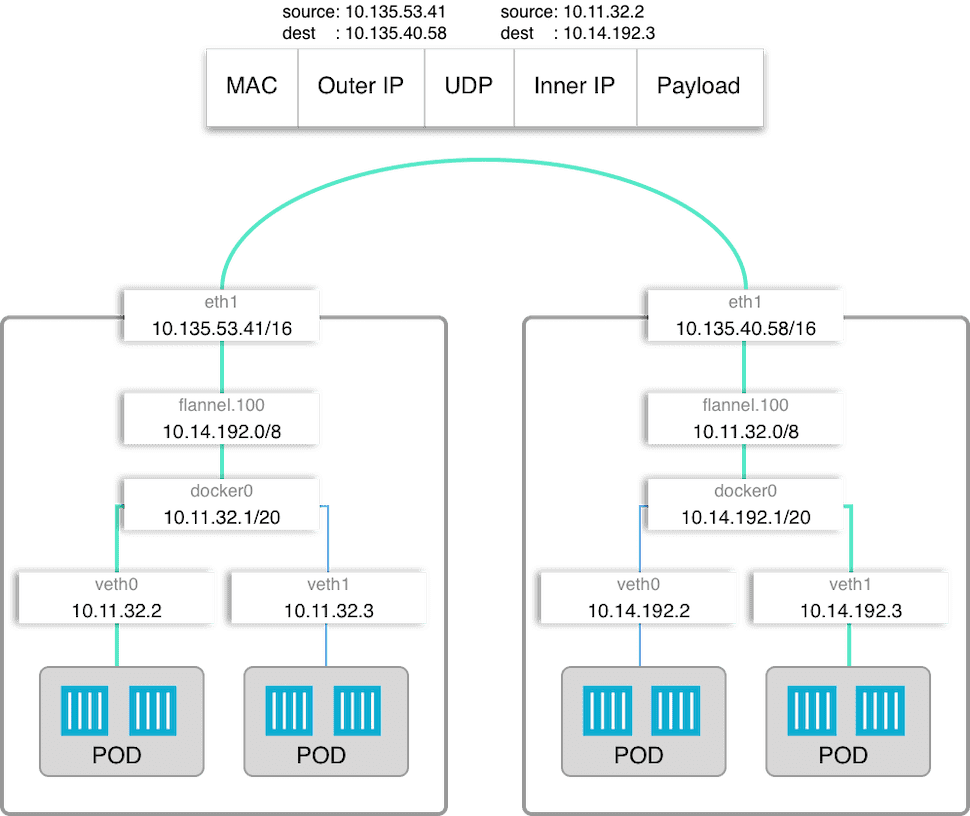
This is how our networking will look like, it also shows how flannel works in the big picture.
Applying what we’ve just learned, now we can run flannel on our nodes. The tricky part is to configure docker to use flannel. This is what we are going to do:
- create CNI configuration file and send it to both nodes with
scp
- insert initial flannel configuration to etcd using
etcdctl
- run flannel on both nodes pointing it to our etcd
- rerun kubelet on both nodes with --network-plugin=cni option. That will use previously created config to allocate new pods to the subnet created by flannel
10-flannel.conflist
:
{
"name": "cbr0",
"cniVersion": "0.3.1",
"plugins": [
{
"type": "flannel",
"delegate": {
"hairpinMode": true,
"isDefaultGateway": true
}
},
{
"type": "portmap",
"capabilities": {
"portMappings": true
}
}
]
}
$ scp 10-flannel.conflist root@46.101.177.76:~/
$ scp 10-flannel.conflist root@46.101.98.124:~/
root@k8s-master:~$ mkdir -p /opt/cni/bin
root@k8s-master:~$ curl -L "https://github.com/containernetworking/plugins/releases/download/0.8.2/cni-plugins-linux-amd64-0.8.2.tgz" | tar -C /opt/cni/bin -xz
root@k8s-master:~$ mkdir -p /etc/cni/net.d
root@k8s-master:~$ mv 10-flannel.conflist /etc/cni/net.d
root@k8s-master:~$ export MASTER_IP=10.135.53.41
root@k8s-master:~$ wget -q --show-progress https://github.com/coreos/flannel/releases/download/v0.11.0/flannel-v0.11.0-linux-amd64.tar.gz
flannel-v0.11.0-linux-amd64.tar.gz.1 100%[==================================================================================================================================>] 4.51M 1.15MB/s in 3.9s
root@k8s-master:~$ tar xzf flannel-v0.11.0-linux-amd64.tar.gz
root@k8s-master:~$ mv flanneld /usr/local/bin/
root@k8s-master:~$ ETCDCTL_API=2 etcdctl set /coreos.com/network/config '{"Network": "10.0.0.0/8", "SubnetLen": 20, "SubnetMin": "10.10.0.0","SubnetMax": "10.99.0.0","Backend": {"Type": "vxlan","VNI": 100,"Port": 8472}}'
root@k8s-master:~$ flanneld -iface=$MASTER_IP &> /tmp/flanneld.log &
root@k8s-master:~$ pkill kubelet
root@k8s-master:~$ kubelet \
--config=/var/lib/kubelet/config.yaml \
--kubeconfig=/etc/kubernetes/kubelet.conf \
--network-plugin=cni \
&> /tmp/kubelet.log &
root@k8s-master:~$ systemctl restart docker
Similarly on the worker node, except the etcdctl
part:
root@k8s-worker:~$ mkdir -p /opt/cni/bin
root@k8s-worker:~$ curl -L "https://github.com/containernetworking/plugins/releases/download/0.8.2/cni-plugins-linux-amd64-0.8.2.tgz" | tar -C /opt/cni/bin -xz
root@k8s-worker:~$ mkdir -p /etc/cni/net.d
root@k8s-worker:~$ mv 10-flannel.conflist /etc/cni/net.d
root@k8s-worker:~$ export MASTER_IP=10.135.53.41
root@k8s-worker:~$ export NODE_IP=10.135.53.42
root@k8s-worker:~$ wget -q --show-progress https://github.com/coreos/flannel/releases/download/v0.11.0/flannel-v0.11.0-linux-amd64.tar.gz
flannel-v0.11.0-linux-amd64.tar.gz.1 100%[==================================================================================================================================>] 4.51M 1.15MB/s in 3.9s
root@k8s-worker:~$ tar xzf flannel-v0.11.0-linux-amd64.tar.gz
root@k8s-worker:~$ mv flanneld /usr/local/bin/
root@k8s-worker:~$ flanneld -iface=$NODE_IP -etcd-endpoints http://$MASTER_IP:2379 &> /tmp/flanneld.log &
root@k8s-worker:~$ pkill kubelet
root@k8s-worker:~$ kubelet \
--config=/var/lib/kubelet/config.yaml \
--kubeconfig=/etc/kubernetes/kubelet.conf \
--network-plugin=cni \
&> /tmp/kubelet.log &
root@k8s-worker:~$ systemctl restart docker
and now we can check pods’ IP addresses and try to ping them on different nodes:
root@k8s-master:~$ kubectl get pods -owide
NAME READY STATUS RESTARTS AGE IP NODE
nginx-86c57db685-6brvp 1/1 Running 0 26h 10.11.112.7 k8s-master
nginx-86c57db685-lphqr 1/1 Running 0 26h 10.15.176.4 k8s-worker
nginx-86c57db685-qc687 1/1 Running 0 26h 10.11.112.8 k8s-master
nginx-86c57db685-s6gx7 1/1 Running 0 26h 10.15.176.3 k8s-worker
nginx-86c57db685-zqtxx 1/1 Running 0 26h 10.15.176.2 k8s-worker
root@k8s-master:~$ kubectl run --generator=run-pod/v1 -it curl --image=ulamlabs/curlping --command -- bash
root@curl:/$ ping 10.11.112.7 -c 1 && ping 10.15.176.4 -c 1
PING 10.11.112.7 (10.11.112.7): 56 data bytes
64 bytes from 10.11.112.7: icmp_seq=0 ttl=64 time=0.051 ms
--- 10.11.112.7 ping statistics ---
1 packets transmitted, 1 packets received, 0% packet loss
round-trip min/avg/max/stddev = 0.051/0.051/0.051/0.000 ms
PING 10.15.176.4 (10.15.176.4): 56 data bytes
64 bytes from 10.15.176.4: icmp_seq=0 ttl=62 time=1.999 ms
--- 10.15.176.4 ping statistics ---
1 packets transmitted, 1 packets received, 0% packet loss
round-trip min/avg/max/stddev = 1.999/1.999/1.999/0.000 ms
Sweet, we have a pod to pod communication and this is how our nodes look like now:
Load balancing between nodes
So now we have both nodes fully capable of running pods, what about receiving traffic?
Currently, we accept traffic only on the first node, it will be forwarded to pods on the second node (by flannel) but this is not high availability solution – the first node is single a point of failure.
To solve that we should install Kube Proxy on all worker nodes, after doing that we can add an icing on our cake – DigitalOcean Load Balancer and balance ingress between nodes.
root@k8s-worker:~$ kube-proxy --master=http://$MASTER_IP:8080 &> /tmp/proxy.log &
$ doctl compute load-balancer create --name lb --region fra1 --forwarding-rules entry_protocol:http,entry_port:80,target_protocol:http,target_port:30073 --health-check protocol:http,port:30073,path:/,check_interval_seconds:10,response_timeout_seconds:5,healthy_threshold:5,unhealthy_threshold:3
$ doctl compute droplet list "k8s*"
ID Name Public IPv4 Private IPv4 Public IPv6 Memory VCPUs Disk Region Image Status Tags
63370004 k8s-master 46.101.177.76 10.135.53.41 2048 2 40 fra1 Ubuntu 18.04.3 x64 active
63460608 k8s-worker 46.101.98.124 10.135.40.58 2048 2 40 fra1 Ubuntu 18.04.3 x64 active
$ doctl compute load-balancer add-droplets 58f02699-5717-43e6-bbfe-51ef4cc0a227 --droplet-ids 63370004,63460608
$ doctl compute load-balancer get 58f02699-5717-43e6-bbfe-51ef4cc0a227
ID IP Name Status Created At Algorithm Region Tag Droplet IDs SSL Sticky Sessions Health Check Forwarding Rules
58f02699-5717-43e6-bbfe-51ef4cc0a227 67.207.79.225 lb active 2017-09-27T09:40:56Z round_robin fra1 63370004,63460608 false type:none,cookie_name:,cookie_ttl_seconds:0 protocol:http,port:30073,path:/,check_interval_seconds:10,response_timeout_seconds:5,healthy_threshold:5,unhealthy_threshold:3 entry_protocol:http,entry_port:80,target_protocol:http,target_port:30073,certificate_id:,tls_passthrough:false
$ curl http://67.207.79.225
<!DOCTYPE html>
<html>
<head>
<title>Welcome to nginx!</title>
Everything works, we could even assume that we have production ready cluster 😀 but of course, we are far from that.
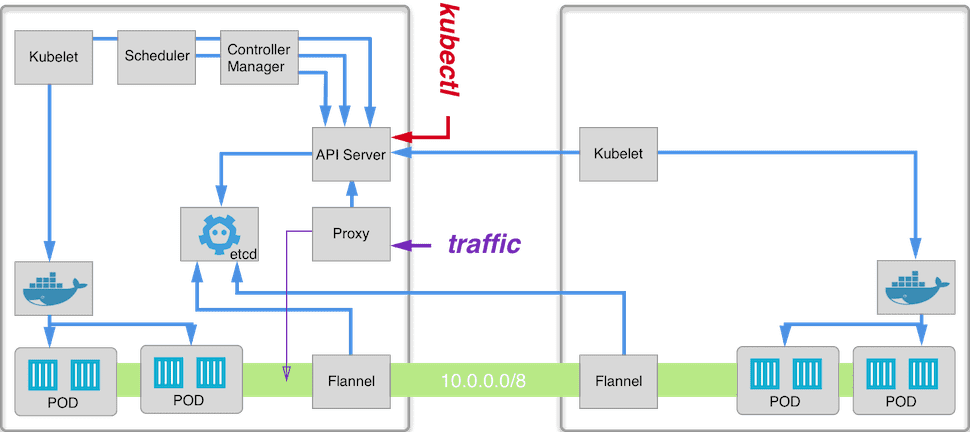
This is how our cluster looks now:
Setting up Kubernetes component - Ingress
Load balancer is a great tool to expose our cluster to the public, but still it's not the best what you can get. As your cluster will grow, possibly you'll end up in situation where you'll need more and more load balancers. In production environment, usually you will want to replicate your control plane node for high availability, so you will have to set up a load balancer balancing traffic between control plane nodes. Usually you will deploy a few or lot of applications inside your cluster. That will lead you to setting up a load balancer of each application. The problem is, every load balancer costs money. Single load balancer does not cost a fortune, but as your kubernetes cluster grows, cost will become significant. You can solve this problem with another Kubernetes component - Ingress. Its task is to define routing rules to the services inside the cluster. For example, you can configure which service will be targeted depending on Host HTTP header.
First you will need an ingress controller which will be deployed as a NodePort service and previously created load balancer will lead to it instead of nginx service. There is a variety of ingress controllers available, we will use NGINX controller here.
Let's start with creating nginx-ingress.yaml
manifest file, don't forget to replace server IP with internal IP
of your master node in nginx-ingress-kubeconfig
:
apiVersion: v1
kind: Namespace
metadata:
name: nginx-ingress
---
apiVersion: v1
kind: ConfigMap
metadata:
name: nginx-ingress-kubeconfig
namespace: nginx-ingress
data:
ingress-controller.kubeconfig: |
apiVersion: v1
kind: Config
clusters:
- cluster:
server: http://10.135.53.41:8080 # replace with your master node internal IP
name: kubernetes
contexts:
- context:
cluster: kubernetes
user: nginx-ingress-controller
name: default
current-context: default
preferences: {}
users: null
---
apiVersion: apps/v1
kind: Deployment
metadata:
name: nginx-ingress
namespace: nginx-ingress
spec:
replicas: 1
selector:
matchLabels:
app: nginx-ingress
template:
metadata:
labels:
app: nginx-ingress
spec:
containers:
- image: quay.io/kubernetes-ingress-controller/nginx-ingress-controller:0.30.0
args:
- /nginx-ingress-controller
- --kubeconfig=/etc/kubernetes/ingress-controller.kubeconfig
name: nginx-ingress
ports:
- name: http
containerPort: 80
securityContext:
allowPrivilegeEscalation: true
runAsUser: 101
capabilities:
drop:
- ALL
add:
- NET_BIND_SERVICE
volumeMounts:
- mountPath: /etc/kubernetes
name: nginx-ingress-kubeconfig
env:
- name: POD_NAME
valueFrom:
fieldRef:
fieldPath: metadata.name
- name: POD_NAMESPACE
valueFrom:
fieldRef:
fieldPath: metadata.namespace
automountServiceAccountToken: false
volumes:
- name: nginx-ingress-kubeconfig
configMap:
name: nginx-ingress-kubeconfig
---
apiVersion: v1
kind: Service
metadata:
name: nginx-ingress
namespace: nginx-ingress
spec:
type: NodePort
ports:
- port: 80
targetPort: 80
nodePort: 30073
protocol: TCP
name: http
selector:
app: nginx-ingress
Next, rerun the nginx
service with ClusterIP
type and run the ingress controller
root@k8s-master:~$ kubectl delete svc nginx
root@k8s-master:~$ kubectl expose deploy nginx --port=80
root@k8s-master:~$ kubectl apply -f nginx-ingress.yaml
Now we can create a simple Ingress resource which will forward all requests to the nginx
service. Create
ingress.yaml
manifest:
apiVersion: networking.k8s.io/v1beta1
kind: Ingress
metadata:
name: simple-ingress
spec:
rules:
- http:
paths:
- path: /
backend:
serviceName: nginx
servicePort: 80
root@k8s-master:~$ kubectl apply -f ingress.yaml
root@k8s-master:~$ curl http://67.207.79.225
<!DOCTYPE html>
<html>
<head>
<title>Welcome to nginx!</title>
Everything work as before, we can access the nginx
service by the load balancer. Benefits from using Ingress rise when there are, let's say, 10 applications with different domains on your cluster. Instead of setting up a load balancer for each application, you'll need only one for the ingress controller, and ingress will do the rest later on.
Running Flannel as a DaemonSet
When you were setting up the second node, probably you have noticed that there is a lot of repetitive work - running and configuring kube-proxy and flannel. As the cluster grows, likely there will be more services that will be needed on each node. For this purpose there are another Kubernetes resource - DaemonSet. DaemonSet does exactly that - it runs a pod on each node in the kubernetes cluster.
At first, on both nodes kill flanneld process with pkill flanneld
, next, on the master node create flannel
manifest file, replace IP in --etcd-endpoints option with your master node internal IP:
apiVersion: v1
kind: ConfigMap
metadata:
name: flannel-cfg
namespace: kube-system
labels:
app: flannel
data:
cni-conf.json: |
{
"name": "cbr0",
"cniVersion": "0.3.1",
"plugins": [
{
"type": "flannel",
"delegate": {
"hairpinMode": true,
"isDefaultGateway": true
}
},
{
"type": "portmap",
"capabilities": {
"portMappings": true
}
}
]
}
---
apiVersion: apps/v1
kind: DaemonSet
metadata:
name: kube-flannel
namespace: kube-system
labels:
app: flannel
spec:
selector:
matchLabels:
app: flannel
template:
metadata:
labels:
app: flannel
spec:
hostNetwork: true
tolerations:
- operator: Exists
effect: NoSchedule
initContainers:
- name: install-cni
image: quay.io/coreos/flannel:v0.11.0-amd64
command:
- cp
args:
- -f
- /etc/kube-flannel/cni-conf.json
- /etc/cni/net.d/10-flannel.conflist
volumeMounts:
- name: cni
mountPath: /etc/cni/net.d
- name: flannel-cfg
mountPath: /etc/kube-flannel
containers:
- name: kube-flannel
image: quay.io/coreos/flannel:v0.11.0-amd64
securityContext:
capabilities:
add: ["NET_ADMIN"]
command:
- /opt/bin/flanneld
args:
- --iface=$(NODE_IP)
- --etcd-endpoints=http://10.135.53.41:2379 # replace with your master node internal IP
env:
- name: POD_NAME
valueFrom:
fieldRef:
fieldPath: metadata.name
- name: POD_NAMESPACE
valueFrom:
fieldRef:
fieldPath: metadata.namespace
- name: NODE_IP
valueFrom:
fieldRef:
fieldPath: status.hostIP
volumeMounts:
- name: run
mountPath: /run/flannel
- name: flannel-cfg
mountPath: /etc/kube-flannel
volumes:
- name: run
hostPath:
path: /run/flannel
- name: cni
hostPath:
path: /etc/cni/net.d
- name: flannel-cfg
configMap:
name: flannel-cfg
root@k8s-master:~$ kubectl apply -f flannel.yaml
root@k8s-master:~$ kubectl get pods -n kube-system
NAME READY STATUS RESTARTS AGE
kube-flannel-mjk7w 1/1 Running 1 4m12s
kube-flannel-smk6t 1/1 Running 1 3m58s
root@k8s-master:~$ systemctl restart docker
root@k8s-worker:~$ systemctl restart docker
$ curl http://67.207.79.225
<!DOCTYPE html>
<html>
<head>
<title>Welcome to nginx!</title>
As you see, everything works as before, and now, if you add a node to the cluster, flannel will be set up automatically. You can now try setting up kube-proxy as DaemonSet yourself.
Wrapping up on Kubernetes deployment from scratch
In this blog post, we have learned how nodes in the kubernetes cluster communicate together and how pods are exposed to the outer world through services. Next we have learnt about two extremely useful Kubernetes resources - Ingresses and DaemonSets. There are more aspects of Kubernetes that we need to cover before we can say that our cluster is production ready. We are going to cover them in future blog posts, so stay tuned!
If you’d like to know more about our services for your business, don’t hesitate to get in touch.
Related blogposts:
****Convox As A Solid Kubernetes Alternative