In this post, I will go into details on how to set up your own EOS testnet. It pieces together bits of info from StackOverflow, official docs and personal experience. If you’re in the hurry, you can skip ahead and just use our Docker image, which is available here.At Ulam Labs, we took on the task of running our custom EOS testnet. There are two reasons behind that:
- Those pesky faucets - we’ll be making a lot of new accounts and submitting transactions. Since token supply on the network is limited, testnets such as Jungle make use of faucets to distribute them. If you’re not familiar with faucets, it’s basically a website where you can enter your address and a small amount of coins will be sent to you. While we could use that, it would slow us down. On a custom testnet we control all the coins and we can do whatever we want with them.
- Testing - we want to test our code against a real RPC node, while also not relying on an external service. We’d ideally like to have the same initial state of the blockchain on each run for the tests to be reproducible. It’d be annoying to deal with build failures caused by, for example, insufficient resources on our testing account. We can solve this by utilizing a Docker image of a custom testnet in our CI pipeline.
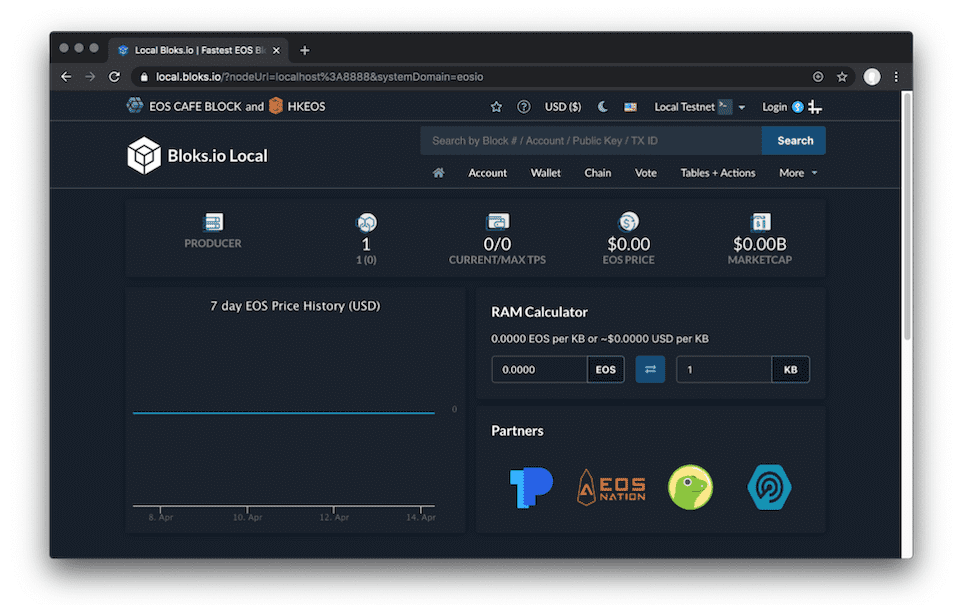
Apart from the network itself, it would also be nice to have a working block explorer and a wallet. Fortunately, the EOS community has us covered. There is an excellent explorer called Bloks.io, developed by EOS Cafe Block and HKEOS block producers. You can simply choose “Local testnet” from the menu, enter the URL, port and you’re done. It integrates well with another app, called Scatter. It’s an open-source wallet app supporting multiple blockchains, including EOS.
Which EOS version should I use?
Preparing our EOS testnet
To make things easier to follow regardless of the platform you’re using, we’ll use Docker. While Block.one themselves no longer provide Docker images, the team behind EOS Studio does a great job with that. The first step is to generate keys for the eosio account. For that, we need the cleos command line tool. Let’s start by running an interactive shell in the Docker container.
The process itself is quite straightforward. First, create a new wallet:
Then, create the keypair:
And export it, you’ll be asked for the password from step one.
Save it somewhere, we’ll need this later and we won’t be using that container anymore. The first string, prefixed with EOS is a public key, the other one is a private key. Now that we have the keys, you can exit the container and we can prepare a genesis.json file. This file defines initial parameters for our network, such as the key for eosio account, timestamp of first block etc. Contents of this file will be hashed to generate a unique chain ID. This identifier is used to tell it apart from other networks.
Don’t forget to replace “your public key” with the key from the previous step. You can leave the other parameters as-is. The other file that we need to provide is config.ini. This will tell nodeos which plugins should be enabled etc. While all of these can be passed as arguments, we’ll end up with quite a long list of options. Simply mounting a file to our container is just more convenient, especially if we wanted to adjust them later.
With both files in our working directory, we can start our genesis node.
This will spin up a fresh EOS node with our config. It should be up and listening on port 8888. You can use bloks.io explorer to verify that it works. Clicking through the explorer, you can also notice a couple of things. First of all, there is only 1 account, called eosio. There is no EOS cryptocurrency nor resource limits. It’s a clean slate.
Bootstrapping the network
Time to get our hands dirty. What’s different about EOS compared to other blockchains is that it takes smart contracts to a whole new level. A lot of basic functionality that you take for granted on either production network or Jungle Testnet is simply not there by default. You’ll have to jump through a couple more hoops to get that. Let’s take for example the EOS digital currency itself. This functionality is provided by eosio.token smart contract. You have to build and deploy all the basic contracts by yourself. Spawn a shell inside a container:
To be able to build the contracts, we need to install EOSIO.CDT. CDT stands for Contract Development Toolkit. For eosio 1.8.x, the recommended version of CDT is 1.6.3. Installing it is as simple as downloading a .deb package from GitHub and using apt to install it.
To be able to build the contracts, we will also need a couple of tools such as Git, cmake and gcc compiler, these can also be installed using apt. Smart contracts on the EOS blockchain are developed using C++ and compiled to WebAssembly.
Now we need to clone the contracts git repository. Recommended version is 1.8.3. As I mentioned earlier, newer versions require this one to be built and deployed first, as they depend on a protocol feature that can only be enabled by calling a method of system contract.
On EOS, a smart contract is always attached to the account. Aside from eosio account itself, we need to also create these:
- eosio.token - manages tokens on EOS blockchain,
- eosio.bpay - pays block producers for the blocks which they mined,
- eosio.vpay - pays block producers per vote,
- eosio.msig - handles multi-signing, essentially allows you to use your key to accept or refuse a proposed transaction,
- eosio.names - handles premium name bidding. Premium account names can be shorter than 12 characters and be used as a prefix, similar to eosio;
- eosio.ram - holds all the EOS which was spent on RAM bytes,
- eosio.rex - EOS Resource Exchange, allows you to borrow and lend resources such as CPU, NET and RAM bytes,
- eosio.ramfee - holds all the EOS which was spent on RAM fees in case it was acquired through REX,
- eosio.saving - account funded through “inflation” mechanism built into the EOS protocol. Each time EOS supply is increased, a certain percentage of that amount is sent to this account;
- eosio.stake - holds all staked resources,
- eosio.wrap - allows block producers to execute privileged actions, requires about 70% of them to agree.
To do that, we need to import the private key which we created earlier:
Now we can use cleos to create all of these accounts. I recommend assigning your public key to a variable, because we’ll be using that one a lot. Every account on EOS needs to have at least one key assigned to it.
We also need to make the eosio.msig account privileged.
With accounts being ready, we can begin deploying smart contracts. The first one is a system contract. There are two example system contract implementations, eosio.bios, which provides just the basic functionality, such as activating protocol features, and eosio.system. We’ll use the second one, as it has all the bells and whistles such as resource management, name bidding etc.
Optionally, you can enable these protocol features:
Calling init method on eosio contract sets our token as a system token. The other parameter is precision - in our case it’s up to 4 decimal places.
With that in place, we’re basically up and running, but I’d like to add one last finishing touch. Currently, our chain is not activated, which means we can’t unstake EOS. For it to be considered activated, 15% of system tokens supply must be staked and participating in voting.
Please bear in mind that the combined amount of tokens staked by the accounts has a direct impact on CPU and NET bandwidth prices.
Final notes
To be able to see transaction history in either the block explorer or to query it through the API, you need to enable the history plugin, which is deprecated and it’s not recommended to use it. The problem with the plugin is that it stores the entire blockchain history in memory. You could modify the “filter-on” parameter in config.ini. This tells the history plugin which actions it should index, which can reduce the memory usage. If you’re willing to go one step further, Greymass maintains a forked version of EOS with their custom history plugin. The fork not only stores the data on your hard drive instead of in RAM, it also allows you to define your custom data retention policy. You can read more on that in a post on their steemit.